What Have You Fettled Today?

Page may contain affiliate links. Please see terms for details.

Bristolian

Senior Member
Location
Bristol, UK
Not so much a fettle as a roadside repair really. As I applied the brakes for a red traffic light today - yes, I do stop for red lights - there was an awful metal-on-metal noise. At first I thought it was the car next to me but it was definitely coming from the rear of my bike:cry: At the first opportunity I stopped and upended the bike to remove the back wheel; no obvious problem with the wheel rim so checked the brake blocks. The culprit was a tiny sliver of aluminium embedded in one of them, which I managed to prise out with my finger nail. Result! Nice quiet brakes again :okay:
I also took the opportunity to check I hadn't picked up a similar piece of metal in the tyres ... all good and ride completed :bravo:
 

the_mikey

Legendary Member
I wear through right foot cleats much quicker than my left, (which makes me left footed?) and fitted a replacement Look keo cleat on my right shoe this evening.
 

Jameshow

Veteran
finished refurbishing my 2009 Focus Cayo 105.
new gear / brake housings and cables all round. new bar tape. every other part stripped and cleaned. i still have the receipt for it, cost £824.25 from the now defunct Wiggle.
weight is just shy of 8.5Kg. my new bike is 12Kg (with accessories albeit) , so I like to think i'm fitter carrying that extra weight around ^_^ having said that i pushed up all the same hills on a 12-27 cassette on the Cayo (largest ring on the new bike is 34 :sweat:). sad thing is i think this is just going into storage now. i have a plan to use it on the turbo trainer over the winter months. need to get some clipless pedals for it just.


View attachment 736837

That's a summer bike surely?
 

Bristolian

Senior Member
Location
Bristol, UK
Spent another half an hour adjusting the front derailleur (again) and think I may have got it right this time ^_^ I followed the same Specialized instructions as previously so not sure what is different but hey ho! A 24 mile ride without any problems from the mech appears to support my thoughts ... only time will tell :okay:

Back to the drawing board today as despite my previous thoughts the last fettling of the front derailleur didn't work :cry: and the change between chainrings was still inconsistent. I'm convinced that there's nothing mechanically wrong with the derailleur of brifter so armed with all new inner cables and outers I set about to strip and rebuilt both brakes and both shifter set-ups.

Taking my time and following the Shimano manual, which I can pretty much recite in my sleep, I set everything up as per the book. Brakes? Fine (no, actually excellent with the new cables and Jagwire uncompressible outers). Rear derailleur? No problems. Front derailleur? No difference :wacko:... what the heck am I doing wrong?

I took a step back forcing myself not to carry out some seriously detrimental carnage to the bike. Then I spotted that where the cable comes up from between the chain stays and attaches to the FD it's not straight; it has a curve just before the pinch bolt. Weird thinks I so I take a closer look and notice (for the first time) that I have got the cable on the wrong side of what I can only describe as a guide. It's actually a little piece of metal that sticks out to guide the cable under the pinch bolt washer. Oh well, better put that right I suppose ... and hey presto we're all good again! So my saga is finished and I have crisp gear changing again ... a lesson learned and not to be forgotten.

I do have one question for the enlightened amongst you; how are you supposed to cut uncompressible outers? I tried several methods but ended up having to use a hacksaw!
 

si_c

Guru
Location
Wirral
I do have one question for the enlightened amongst you; how are you supposed to cut uncompressible outers? I tried several methods but ended up having to use a hacksaw!
Glad you got it sorted.

I use a pair of good cable cutters to cut mine, it gives me a near perfect finish, which I tidy up using an awl and a file to square the end off.

Edit to add: they're the Lifeline Pro cable cutters from wiggle, sadly no longer available. The cable cutters I had before will cut them but they're harder to cut and the result not so good.
 

sevenfourate

Devotee of OCD
‘Reset’ my front disc Caliper position after taking the wheel off to try a different tyre liner - and then suffering some disc rub.

The disc has never rubbed before in all the removals / installs. But for some reason did last night (I have very recently fitted new brake pads too - so I guess far less clearance than I’ve had for some time).

Either way - the suggested “Undo all bolts to allow movement, clamp on brake to centralise Caliper; hold on firm and tighten bolts” didn’t work. At all.

Took 5-10 mins fiddling (Despite free Caliper pistons, a disc I couldn’t see running out of true and no other obvious issues) 🤦‍♂️🤷‍♂️ to get it running free. But I achieved with the minimal amount of swearing. Or toys expelled from the pram……
 

Gunk

Guru
Location
Oxford
I started work on my 1960 Tiger Cub, this is a long term project, it was restored about 15 years ago and then used so I’m just going through it, detailing and recommissioning it. I thought I’d go front to back so I pulled off the front mudguard, stripped it and gave a deep clean, cleaned all the nuts and bolts in white spirit and repainted the brackets which hold on the front number plate. The front wheel Rim is the next job.

IMG_3361.jpeg


IMG_3748.jpeg


IMG_3749.jpeg


IMG_3750.jpeg
 

Bristolian

Senior Member
Location
Bristol, UK
Glad you got it sorted.

I use a pair of good cable cutters to cut mine, it gives me a near perfect finish, which I tidy up using an awl and a file to square the end off.

Edit to add: they're the Lifeline Pro cable cutters from wiggle, sadly no longer available. The cable cutters I had before will cut them but they're harder to cut and the result not so good.

Thanks for the info si_c. None of my cutters would do the job :sad:
 
I started work on my 1960 Tiger Cub, this is a long term project, it was restored about 15 years ago and then used so I’m just going through it, detailing and recommissioning it. I thought I’d go front to back so I pulled off the front mudguard, stripped it and gave a deep clean, cleaned all the nuts and bolts in white spirit and repainted the brackets which hold on the front number plate. The front wheel Rim is the next job.

View attachment 737473

View attachment 737474

View attachment 737475

View attachment 737476

Those tools on the table look a bit ominous, is the poor cub going to have some major surgery operation? :laugh:
 

DCLane

Found in the Yorkshire hills ...
The bike workshop at my university re-threaded a couple of bottom bracket areas for me; firstly on the Carlton I'm about to put back together and secondly on the Dawes Kingpin modification project that's been stalled for 18 months and is getting going again.

My LBS put a spoke into a carbon wheel that had snapped and trued it.

And me? I've been cleaning the Carlton parts prior to re-fitting. I had flammable chemicals cleaning parts in the conservatory and explosive chemicals cleaning paint off parts outside, which seemed to be the sensible option. Almost ready for re-fitting ...

And my Merida Cyclo-Cross commuter has had a new chain, a new tube and a general clean-up after 1500 miles of commuting and general use since acquisition last November.
 

sevenfourate

Devotee of OCD
Trued a slight / slow kink in my front wheel. And tightened the spokes. Again.

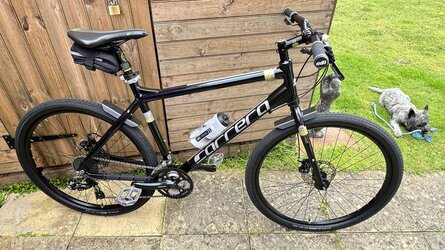
This Carrera I generally ride and absolutely love is actually my Sons. I’ve had bikes 5 (?) times the cost new. None I’ve enjoyed riding anything like this one…..

But: the spokes are mild steel. Many are painfully thin where they cross. All have varying amounts of rust. Crank / gears are about to give up the ghost too. And a few other parts are near the end of their life too.

Unfortunately in this throw-away World it’s going to make more sense financially to put the costs of replacing those parts toward something else. While that doesn’t ‘frighten’ me - it’s a shame the cost of parts and labour to keep this running sweet is probably going to end up making in unviable.
 

Attachments

  • IMG_4303.jpeg
    IMG_4303.jpeg
    284.2 KB · Views: 9
Last edited:
The bike workshop at my university re-threaded a couple of bottom bracket areas for me; firstly on the Carlton I'm about to put back together and secondly on the Dawes Kingpin modification project that's been stalled for 18 months and is getting going again.

My LBS put a spoke into a carbon wheel that had snapped and trued it.

And me? I've been cleaning the Carlton parts prior to re-fitting. I had flammable chemicals cleaning parts in the conservatory and explosive chemicals cleaning paint off parts outside, which seemed to be the sensible option. Almost ready for re-fitting ...

And my Merida Cyclo-Cross commuter has had a new chain, a new tube and a general clean-up after 1500 miles of commuting and general use since acquisition last November.

Hey Mr DC, how dare you deprive us of them Kingpin pics :angry:
 

pawl

Legendary Member
I started work on my 1960 Tiger Cub, this is a long term project, it was restored about 15 years ago and then used so I’m just going through it, detailing and recommissioning it. I thought I’d go front to back so I pulled off the front mudguard, stripped it and gave a deep clean, cleaned all the nuts and bolts in white spirit and repainted the brackets which hold on the front number plate. The front wheel Rim is the next job.

View attachment 737473

View attachment 737474

View attachment 737475

View attachment 737476

That’s a nice bike.Nice to see a bike not hidden by massive fairing’s
 
Top Bottom