Home D.I.Y.

Page may contain affiliate links. Please see terms for details.

MontyVeda

a short-tempered ill-controlled small-minded troll
The cyclinder on mine is acrylic plastic and has cracked at the tightening bolt hole.
Got a replacementbplunge router from screwfix which is s bit more powerful and accurate.
I like the idea of interchangeable base for trim or plunge as well as table and jig bases.

here's a very simple centering 'jig' that'll take ten minutes to make and about two minutes to fit

you need:
a couple of longish machine screws that fit into the base (M4 in my case)
a couple of small bearings that fit snugly onto the machine screws
a few washers and nuts to use as spacers.
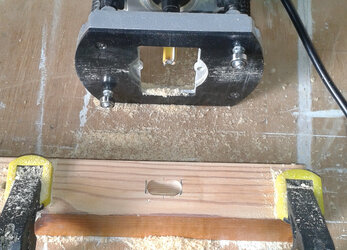
router centering pins.jpg

providing the bearings and bit are all in line, the bit will cut dead centre when the bearings are engaged with either side of the workpiece.

using the clamps as end stops, it took me about half an hour to cut 48 little mortices :okay:
 
Last edited:
discovered a broken garage door wheel at Mother's house
g wheel 1.jpg

got the parts locally, wheel on spindle & 3 screws, turned out to be an easy fix
g wheel 2.jpg

garage door is happy & quiet again
g wheel 3.jpg
 

CXRAndy

Guru
Location
Lincs
Shower is complete, but can't wet test it yet due to waste are combined with basin and bath. So today I cut to length, dry fit all the waste pipes. Then set about butchering the chest of draws the wife bought for me to install a basin onto. Back cut out, top multiple holes, bottom section removed for copper legs to fit. It all fits now, but will have to cut two drawers to allow basin trap and flexible tales to fit. When your wife wants custom , it takes time to get it right. :blink:

I then have to move into loft space, to upgrade the ventilation for bathroom. I'm fitting high flow in-line centrifugal fan for the shower area and a humidistat constant running fan for the main area. T the pipework, add back draft shutters, insulate the flexible pipework.

Then outside for finishing off waste for toilet after I repositioned the foul waste point. That is the bathroom. My mate joiner is coming to install a wrap around staircase. I will be assisting in the lift when he requires a hand
 

MrGrumpy

Huge Member
Location
Fly Fifer
Shower is complete, but can't wet test it yet due to waste are combined with basin and bath. So today I cut to length, dry fit all the waste pipes. Then set about butchering the chest of draws the wife bought for me to install a basin onto. Back cut out, top multiple holes, bottom section removed for copper legs to fit. It all fits now, but will have to cut two drawers to allow basin trap and flexible tales to fit. When your wife wants custom , it takes time to get it right. :blink:
Hope your chest if drawers is suitable for use in areas of high moisture? I did similar with an Ikea chest of drawers and basin sitting on top . It really didn’t end well after a year or so !
 
Shower is complete, but can't wet test it yet due to waste are combined with basin and bath. So today I cut to length, dry fit all the waste pipes. Then set about butchering the chest of draws the wife bought for me to install a basin onto. Back cut out, top multiple holes, bottom section removed for copper legs to fit. It all fits now, but will have to cut two drawers to allow basin trap and flexible tales to fit. When your wife wants custom , it takes time to get it right. :blink:

I then have to move into loft space, to upgrade the ventilation for bathroom. I'm fitting high flow in-line centrifugal fan for the shower area and a humidistat constant running fan for the main area. T the pipework, add back draft shutters, insulate the flexible pipework.

Then outside for finishing off waste for toilet after I repositioned the foul waste point. That is the bathroom. My mate joiner is coming to install a wrap around staircase. I will be assisting in the lift when he requires a hand
If you putting a basin in, make sure you support the top to stop it bowing over time. We had a basin that sat on top of a shelf and over time it warped the shelf with its weight.
 
the Mother's house has a front entry door that sticks, depending on the weather. looking at it I see that there's some old paint, w/ rub marks. I'm thinking I should strip the door jam & the door edge, then recoat w/ just a thin coat of paint

any opinions on stripping these 2 areas? chemicals? heat gun? drill mounted sanding device?

please don't even get me started on the condition of the exterior paint of the house ... I know, I know. right now I just want the door to be easier for the Mother to open!

the door jam
door jam.jpg

the door edge
door edge.jpg
 
@MichaelW2

the house was built in 1966

just looked this up: Lead-based paints were banned for residential use in 1978. Homes built in the U.S. before 1978 are likely to have some lead-based paint. When the paint peels and cracks, it makes lead paint chips and dust.

I have no memory of painting this door jam. our parents did hire professional painters to do the house inside & out at least a cpl of times, but no real memory of the year, so thank you
 

CXRAndy

Guru
Location
Lincs
Would you know if the door is tighter in wet weather. Planing can be useful, but beware in dryer weather there maybe a larger gap than desirable
 

lazybloke

Today i follow the flying spaghetti monster
Location
Leafy Surrey
View attachment 709496 Fitted the upgraded extractor/s with joined pipes. I ended up using two back draft valves. The air was going in the wrong direction :laugh:

Old v new extractor
That fan looks identical to one I fitted last year. One thing I must do is inspect the controller for overheating; the previous (smaller) fan had a large resistor that would get very hot and scorch the plastic housing; really hoping this doesn't do similar, as it seemed a bit of a fire risk to have in my ceiling/loft.

Really happy with how quiet it is at full speed. No need for adjustment.
 
Top Bottom