Brompton dogleg change for 2007 SL

Page may contain affiliate links. Please see terms for details.

Fastpedaller

Über Member
I've taken the plunge and changed to 160mm cranks sourced from our friends at Spa Cycles, and I have one (expected) question, and another (unexpected) one! :rolleyes:
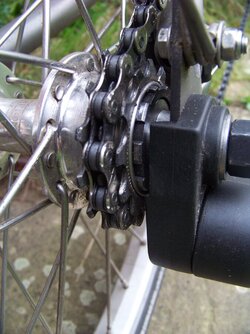
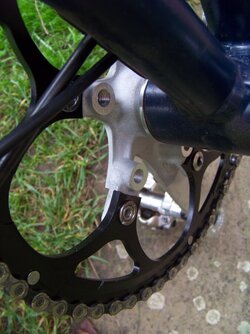
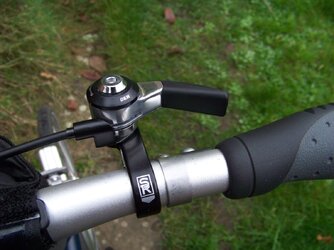
As it's a 2007 model it has the 2 speed shifter complete with bell :laugh:. As part of the 'change' I'm also fitting 3 sprockets on the freehub (I did that with success yesterday) and fitting a Sunrace friction shifter. That's the unexpected snag..... because the shift cable has a nipple at the derailleur end the original shifter has a 'solderless nipple' with a grub screw fixing at the shifter end. The friction shifter end needs a similar solderless nipple and the only ones I can find online are turned 90 degrees to what's required. It looks like the easiest way to sort it is to buy a post-2017 dogleg, which will fit my frame - Can anyone confirm this? The 'expected' question is regarding the bottom bracket length. I've trial fitted a 110mm length and (although I've mounted the chainring on the inside) the chainline is further out than ideal. I guess it needs either a 107 or more likely a 103mm unit, but depends of course on the 'stickout' length of the RHS beyond the cup (17mm with 110 unit). Does anyone who has fitted the Spa XD2 cranks know what length bb creates the 44mm chainline?
 
OP
OP
F

Fastpedaller

Über Member
Crikey - this has turned into a 'maybe I should never have started this' exercise. Last week I received a 'spare' Brompton 2 -speed rear hub I'd bought off Ebay. It had an issue where it wouldn't freewheel properly if the alloy axle spacers were tightened - this turned out to be a poor repair to replace the freehub bearing. The bearing hadn't been pressed home fully and the circlip was missing. Fixed now, although it seems to have a bit of drag, so I may replace the bearing. Went about fitting the 10 speed sprockets off a Shimano HG500 11-25. My new chainring choice is 52T from Spa with 160mm cranks (my main reason to change was crank length). The 12 and 13 sprockets are shaped to fit engage with one another so I found my choice of 13/14/15 gearing wasn't possible and I had to accept 12/13/15 as my compromise. The 'spare' freehub was used to trial the fitment, and I had to file about 1.2mm off the inner edge (the part the inner sprocket butts against, to be able to fit the 3 sprockets and a snap ring I fabricated from a narrow section of a double-butted spoke. Despite being stainless rather than spring steel, I'm convinced it will never release unintentionally. The 12 sprocket was just touching the plastic of the tensioner, so I spaced it with a plastic spacer cut from a credit card as other Brompton owners have done. So far so good. A 103mm bb arrived today and gives the same chainline as the original crankset ...... I'm using the spa cranks with the chainring mounted in the middle. As the spa cranks also have the mounting for the granny ring (even if it's a double set) it presented a problem! The castings cleared everything ok for cycling, however if the rear triangle is folded under they clashed with the chainstay. So some 'engineering was done with a powerful! (unfortunately I don't have a Bridgeport mill or lathe). That done, the cranks were fitted successfully. I then turned to fitting the chain (I'd anticipated a possible issue) and indeed the chain is perilously close to the dropout - If I'd been able to go 13/14/15 it would have probably been ok. So the next job is to use the left alloy spacer nut off the 'spare' hub and reduce it by 1.5mm and add a spacing washer to the gearside to shift the wheel to the left a little. I'll re - dish the rear wheel a tad. So this mod hasn't been straight-forward at all. My B is a 2007 superlight, so I don't want to mess with the Ti rear triangle, I guess if a steel rear triangle is involved a small setting can increase the OLN dimension without fear of consequences. The new DR anchorage/cable mount arrived today from Condor (superb service) and I'm anticipating will be more straight forward. The B is such a compact fold that every part is precise and there isn't much scope for deviation - folk achieving multi-sprocket derailleurs must make some major changes?
 
OP
OP
F

Fastpedaller

Über Member
Update to my 2 to 3 conversion.... Today I decided to modify the left alloy spacer nut off the spare hub. I don't have access to a lathe so the options were to take it to a specialist, crudely file by hand so be a little inventive. The third option was chosen, and I rummaged in a box and dug out an old, unused cheap axle with cones. The thread was the same, so the axle was cut through about half (I said it was a cheapo), and with a cone reversed and used as a locknut the brompton alloy spacer nut was secured to the end. The 'plain bit' of the axle was mounted in the chuck of my electric drill. With the drill clamped in a 'super jaws workbench' it mimicked a lathe! Using a hand file I turned 1.6mm off the end of the spacer. With a 1.6mm thick washer on the drive side the result was adequate chain clearance (indeed I could discard the DIY plastic spacer from behind the tensioner. After having previously measured the clearance from the RH chainstay to the wheel rim, I then redished the rear wheel, which only took 1/2 turn on each RH side spoke. No drama there, and the new dogleg/cable clamp fits well. Only tried in the stand so a road test will follow, but I have 3 gears! It looks like the chain is a 'bit tight' on the jockey wheels, and I wonder if Newer (than 2007) Bromptons have slightly thinner teeth on the jockey wheels - but being as they're plastic they'll probably wear in :laugh:
 

All uphill

Still rolling along
Location
Somerset
I like your saga and its telling.

It sounds like my projects - I understand what I'm working on, but it's very difficult to explain without pictures.
 
OP
OP
F

Fastpedaller

Über Member
First ride today (only a few hundred yards to test) and some observations..... Firstly it works ok and finds all 3 gears. I had put the Sunrace shifter on the handlebar in a 'workstand position' and it became clear once I sat on the bike that it needed to be rotated on the bar a bit to be ideal. I'd also decided to put the shifter on the RHS instead of the left of the original Brompton 2 speed shifter (all my bikes have rear shifter on right!) so therefore had to use a new outer. The shifter needs a lot of angular movement to achieve the shifts (small diameter) but the benefit is that the lever position isn't so precise that it's difficult to achieve. I've noticed with this 'experiment'/change that the chainline measurement (ie, the position of chainring) is critical. With a RPM 103mm bb and Spa (Sugino) cranks the 'same as original Brompton' chainline of 44mm can be achieved, but required 'machining' to the granny ring mounts as described above - other makes of crank may vary. If the chainring is further out (and putting it closer would result in a clash when the rear triangle is folded under) the chain won't line up directly with the middle of the 3 sprockets, which is the ideal. That leads me to conclude if an outer chainring is fitted to achieve 2 chainrings as some folk have done (my chainring is on the inside of spider, just like current bromptons), that the chain must be very much out of line in the big ring unless an aftermarket 135 width rear triangle is used. It would be interesting to know what others have found, especially with up to 7 speed rear wheels!
 

Schwinnsta

Über Member
Update to my 2 to 3 conversion.... Today I decided to modify the left alloy spacer nut off the spare hub. I don't have access to a lathe so the options were to take it to a specialist, crudely file by hand so be a little inventive. The third option was chosen, and I rummaged in a box and dug out an old, unused cheap axle with cones. The thread was the same, so the axle was cut through about half (I said it was a cheapo), and with a cone reversed and used as a locknut the brompton alloy spacer nut was secured to the end. The 'plain bit' of the axle was mounted in the chuck of my electric drill. With the drill clamped in a 'super jaws workbench' it mimicked a lathe! Using a hand file I turned 1.6mm off the end of the spacer. With a 1.6mm thick washer on the drive side the result was adequate chain clearance (indeed I could discard the DIY plastic spacer from behind the tensioner. After having previously measured the clearance from the RH chainstay to the wheel rim, I then redished the rear wheel, which only took 1/2 turn on each RH side spoke. No drama there, and the new dogleg/cable clamp fits well. Only tried in the stand so a road test will follow, but I have 3 gears! It looks like the chain is a 'bit tight' on the jockey wheels, and I wonder if Newer (than 2007) Bromptons have slightly thinner teeth on the jockey wheels - but being as they're plastic they'll probably wear in :laugh:

I did the same thing about ten years ago on my 2014 Brompton. I had to use a thin washer on the inside of the dropout. I went with 12-14-19T.
 
OP
OP
F

Fastpedaller

Über Member
I did the same thing about ten years ago on my 2014 Brompton. I had to use a thin washer on the inside of the dropout. I went with 12-14-19T.

I think my selection of cassette was a failure on my part. Not being familiar with 10-speed cassettes I didn't realise the smaller sprockets were designed to interlock. If I'd chosen the 11-32 cassette I may well have been able to fit my choice of 13/14/15
 

Gunk

Guru
Location
Oxford
Some photos of your conversion would be useful
 
OP
OP
F

Fastpedaller

Über Member
Here's some photos, I'll add descriptions in the order I took the photos.
Photo 1 The non-driveside spacer/nut held with an old axle and cone in a drill chuck - with a file held against it I was able to narrow it by 1.6mm.
Photo 2 (on the 'spare' hub) The previous arrangement of 2 sprockets with random spacers between and using the original snap-ring
Photo3 Shows the drive side spacer/nut and photo4 shows the non-driveside spacer/nut. I've seen on youtube some conversions to multiple sprockets using a new rear wheel - I wonder if a cheaper method could be to swap these spacer nuts over to the other sides and dish the wheel further to centralise it (one is 7.8mm wider than the other, but that is the only difference). This may need shorted spokes on the driveside, but would then accommodate a wider freehub (Brommie plus?) for an additional 2 sprockets. The issue then is what derailleur to avoid huge cost, and I wonder if a standard Shimano would fit using a simple hanger from the dropout instead of the B tensioner.
Photo5 My new arrangement of 3 sprockets held with a DIY snap-ring made from a spoke
photo6 shows the new spa 160mm cranks and 52T chainring
Photo7 the inside of the cranks showing the 'filed to allow clearance' granny ring mounts. If a double chainset is used these are still there as part of the forging, but undrilled, so the task remains the same. If I had a lathe it would have been easier.
Photo8 The Sunrace friction shifter on RHS - this works very well but needed a slightly longer cable and outer.
Photo9 It's easy to make a snap ring by securing a spoke in the vice with an old broom handle or other round piece about 3/4 of the required diameter and turning the spoke around by hand.
photo10 One I made earlier from a plain-gauge spoke - it was too thick so I made a thinner one from the centre portion of a Db spoke.
I can't seem to add all the photos to this note, so I'll add a further 2 sub-notes for that purpose.

139_3173.JPG


139_3174.JPG


139_3175.JPG


139_3176.JPG
 
OP
OP
F

Fastpedaller

Über Member
note 2 with more photos
 

Attachments

  • 139_3177.JPG
    139_3177.JPG
    107.6 KB · Views: 0
  • 139_3178.JPG
    139_3178.JPG
    301.5 KB · Views: 0
  • 139_3179.JPG
    139_3179.JPG
    95.6 KB · Views: 0
  • 139_3180.JPG
    139_3180.JPG
    146.9 KB · Views: 0
Top Bottom