Another Brompton Project

Page may contain affiliate links. Please see terms for details.

Pale Rider

Legendary Member
I've only just realised what I think is going on here.

The computer programming stuff needed to do the 3D printing sorcery of the components is available for free online.

Elton can download those, produce the components on his 3D printer, then send them to the OP.

All clever stuff which makes me feel very behind the times.
 

EltonFrog

Legendary Member
I've only just realised what I think is going on here.

The computer programming stuff needed to do the 3D printing sorcery of the components is available for free online.

Elton can download those, produce the components on his 3D printer, then send them to the OP.

All clever stuff which makes me feel very behind the times.
Yes I can do that, unfortunately I don’t have the skills to design my own stuff unlike @jiberjaber & @JhnBssll .
 
OP
OP
Gunk

Gunk

Guru
Location
Oxford
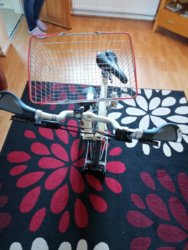
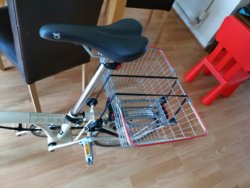
I nipped down to Decathlon and bought the basket this afternoon

509208


It’s a perfect size for the Brompton and it also has a slot for their USB light which I already have.

I’ve had a play and Unfortunately it does need to be mounted up high to clear the front brake caliper

509210


However I think the plastic backing plate can be utilised to fit the Chinese Brompton luggage bracket.

509212


I’ll just have to trial fit it and drill some fresh holes.

509213


Problem is that the bracket has been held up and won’t arrive until mid April, so the basket is up on the shelf in the garage and will have to wait which is a shame as I would have made some use out of it, especially if I’m at home off work next week which looks increasingly likely.

One major irritant I have found with the Brompton is the folding pedal if you don’t unfold it first, it spins around and scratches the frame. I’ll have to get into the habit of folding/unfolding it first.
 

jiberjaber

Veteran
Location
Essex
Yes - drive side pedal horizontal and to the rear is the way I remember when I fold! :smile:

A few more prototypes yesterday.

Here's roughly how the final version will be, I was right you can't get screws in from the bracket side. I've no M5 nuts at the moment so have ordered some, plan is to revise this design to thicken the back plate and recess nuts in to it with a dab of glue to hold them there until the screws are tightened. Mounting from inside the bracket seems stronger without having to make the bracket more bulky (though I am not ruling that out at the moment! :smile: )

Printing orientation has a big impact on bracket strength as does material, these are just standard PLA so quite brittle, final version will be ABS.

Printing in this orientation is quicker but will need some 'vertical' rods inside to give more strength. Printing it flat gives strength in the other direction but makes the bits that wrap around the mounting block weaker and they are harder to reinforce (without making them larger)

1584698755464.png


While I am awaiting the nuts, I decided to confirm mounting location for the shopping trolly mode, so added a quick flange to the bracket - it's weak but just a prototype for location purpose.

1584698606154.png


I think I can tune the height a little more, but this is roughly using the bottom mounting holes.

1584698999213.png
 

Tenkaykev

Guru
Location
Poole
I have that basket and like you I removed the original basket fitting with a view to fitting the printed adapter I purchased a while ago from an Ebay seller in Oz.

I've got a Dynamo light on my Brommie which prevents the Decathlon basket / Brommie adaptor slotting all the way home if mounted where the existing basket fixing sits.

If I fit the Brommie adapter below the existing Decathlon mount then all is ok.
In the meantime I've been playing with an old Supermaarket basket.
I'll be able to attach it on the front and use my Brompton in " Shopping Trolley" mode then put it on the rack for the journey home. 509312

509313

509314
 

jiberjaber

Veteran
Location
Essex
When I was carrying my basket home from Decathlon I noticed I had little tolerance for overhang on the rear without it clipping my heels.

In other news I decided to take a look at my brommy bag frame, they have an additional metal tab looks like its to reduce wear and tear on where the latch is used. Not sure I'll implement it but might be a good idea given how often it might be on and off the bike.

1584706269697.png
 
OP
OP
Gunk

Gunk

Guru
Location
Oxford
Yes - drive side pedal horizontal and to the rear is the way I remember when I fold! :smile:

A few more prototypes yesterday.

Here's roughly how the final version will be, I was right you can't get screws in from the bracket side. I've no M5 nuts at the moment so have ordered some, plan is to revise this design to thicken the back plate and recess nuts in to it with a dab of glue to hold them there until the screws are tightened. Mounting from inside the bracket seems stronger without having to make the bracket more bulky (though I am not ruling that out at the moment! :smile: )

Printing orientation has a big impact on bracket strength as does material, these are just standard PLA so quite brittle, final version will be ABS.

Printing in this orientation is quicker but will need some 'vertical' rods inside to give more strength. Printing it flat gives strength in the other direction but makes the bits that wrap around the mounting block weaker and they are harder to reinforce (without making them larger)

View attachment 509299

While I am awaiting the nuts, I decided to confirm mounting location for the shopping trolly mode, so added a quick flange to the bracket - it's weak but just a prototype for location purpose.

View attachment 509298

I think I can tune the height a little more, but this is roughly using the bottom mounting holes.

View attachment 509300

When you’re done will you print an extra one, I’m happy to pay you for it.
 

jiberjaber

Veteran
Location
Essex
When you’re done will you print an extra one, I’m happy to pay you for it.

Will see how it comes out, still a little away from it yet. I've rehashed the bracket and as a test piece I've gone for M4 fixings for now, will need a back plate as well but that's just a block of plastic at the end of the day (or metal). I'm still concerned about the leverage on the plastic.

Here's the current one that's being printed at the moment, will see how it works out in 3 hours time when it's done. :smile:

1584713107765.png
 

jiberjaber

Veteran
Location
Essex
I don’t intend to put much weight in mine, just newspapers, bread milk etc.
You'd be surprised how quickly it can build up.

I've just noticed that M4 just fits through the holes of the mesh - I might increase the mounting points below the sheet metal part (probably need some spacer to make it work (washers perhaps).
 

jiberjaber

Veteran
Location
Essex
Another (expensive) option is to source a used frame and cable tie the basket to it
Well oddly I went and got my frame out today from my bag but seeing as I don't use the bag at the moment, the thought did cross my mind - it's about 50mm wider than the basket.
Print came out well, but I had a dimension wrong by a mm and as a result it wouldn't slide on the block so another one on the printer as I type (plus a couple of additional mounting holes and a logo )
 
OP
OP
Gunk

Gunk

Guru
Location
Oxford
Just had a quick ride around the block on mine as I haven’t tested it since I fitted the new saddle and tightened up the BB.

It feels great now, I like the Brompton saddle, and now the bottom bracket has had the play taken out of it the drive train feels really nice and smooth. Just need a front basket mounting 😜
 

jiberjaber

Veteran
Location
Essex
So the print has worked out spot on but in the wrong material and in a very draft resolution to speed up prototype - just knocked up a quick basic back plate which is printing now and then I'll fit it and see how that works out. It seems quite sturdy now for some reason though not sure I'd trust it on the road! If all goes well, might set a slow print off in black ABS

1584748642944.png

1584748630113.png
 
Top Bottom