What Have You Fettled Today?

Page may contain affiliate links. Please see terms for details.
Off the bike for around 3 weeks so decided to go through it with a fine tooth comb. Found the non-drive side BB bearing very stiff. A google search found this strangely common. Found a vid online on how to take the sealed ceramic bearing apart, had a go and yes it probably needs a new one as I have beaten the hell out of it for the last 3 years. Now this is where the fun begins. They are FSA carbon K-light cranks. I got them secondhand hardly used for a whole 120 quid 3 years ago. At the time I found a bearing on e-bay for 40 quid. Now new, the only english threaded ones were 145 to 199 quid for a bearing! jesus wept! ( found a italian threaded one for 119) . Now you cant use any other FSA shell because these are especially thin at 6 mm normals are 7 mm have to be 8200 model. I had done a couple of searches on ebay, looked like a was going to have to get one from the USA for about 120 quid however on a last 3rd search one came up in the UK, listed 1 minute ago. New without box, 80 quid. Result! Snapped it up. I bet the seller was surprised.
 

jnrmczip

Senior Member
Location
glasgow
Took out the forks and cleaned the bearings which were causing a squeak that was getting rite on my nerves and spoiling the ride. Job done dirty hands but silence is golden
 

si_c

Guru
Location
Wirral
Bottom bracket started making grinding noises when out on Sunday, took it off yesterday it's not a sealed cartridge unit like I thought (damn you LBS) and the cage holding the bearings had disintegrated, leaving a tangled mess and loads of loose bearings on the drive side. No wonder it felt rough.

Replaced with brand new shimano unit.
 

The_Cycling_Scientist

Über Member
Location
Cambridge
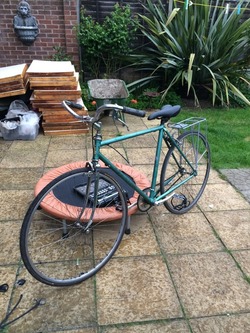
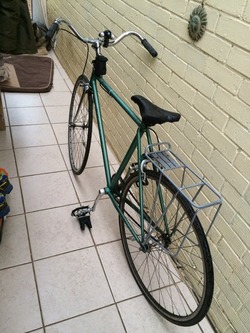
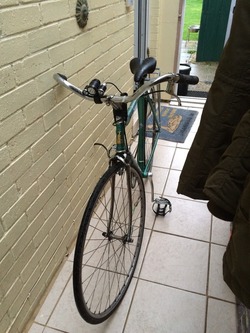
Yesterday I fettled my old Fixed gear into a town style bike as being hunched over too far is a bit far over for me with my back still not 100%
The swap of bars saw a swap of front forks, both tyres to my gatorskins and new brake levers. (I need to change the cables and trunking to accomidate the new brake levers so for now I only have the front brake and the rear is cable tied to the frame for now.
the aim is to next get new grips that look a little bit more old fashion. new brake lines and fit a rear light. there may be more tweaks but for now it is keeping me happy. I may also concider getting a coaster brake hub and making up a rear wheel for if I fancy going single speed :smile: Here's a couple of shots:
D2130BA4-1857-4FC3-BEB2-07A282A4D036_zpsipdggdsg.jpg
A5F2E092-5357-4000-B665-11FC43A9D7C4_zpshtjuo00e.jpg
364355A4-532C-467E-8463-6CF4BB966583_zpsikwz8wzj.jpg
 

Attachments

  • D2130BA4-1857-4FC3-BEB2-07A282A4D036_zpsipdggdsg.jpg
    D2130BA4-1857-4FC3-BEB2-07A282A4D036_zpsipdggdsg.jpg
    163.3 KB · Views: 23
  • A5F2E092-5357-4000-B665-11FC43A9D7C4_zpshtjuo00e.jpg
    A5F2E092-5357-4000-B665-11FC43A9D7C4_zpshtjuo00e.jpg
    127.8 KB · Views: 21
  • 364355A4-532C-467E-8463-6CF4BB966583_zpsikwz8wzj.jpg
    364355A4-532C-467E-8463-6CF4BB966583_zpsikwz8wzj.jpg
    112.9 KB · Views: 20

Psycolist

NINJA BYKALIST
Location
North Essex
In a spare 1/2 hour I removed my suspension seat post from my MTB for a quick check over and lube. All seemed fine, no concerns regarding wear so slapped a bit of grease on the moving parts, re assembled and re fitted. Now I seem to have an annoying 'creek' when riding. I guess I should have left well alone. Who knows when another 1/2 hour will present itself to remedy my error. :bicycle: Anyway, I would rather be riding than fetteling. ;)
 

Salad Dodger

Legendary Member
Location
Kent Coast
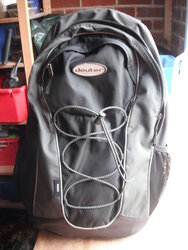
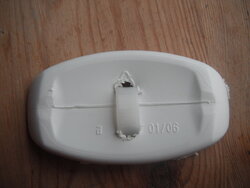
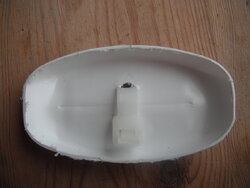
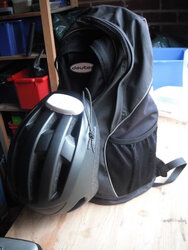
Today I made a helmet carrier to go on my rucksack. (The idea was borrowed from a rucksack I saw online). My rucksack has a elastic arrangement on the outside, presumably to be able to strap a jacket or something on the outside, for immediate access. But I could not find any way to use it to SECURELY hold a crash helmet.
DSCF4465.JPG

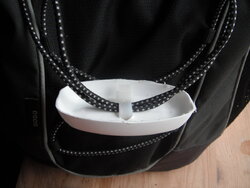
So I cut the bottom off a plastic bottle and used a cable tie to secure it to the elastic on the rucksack.

DSCF4466.JPG DSCF4467.JPG

DSCF4468.JPG

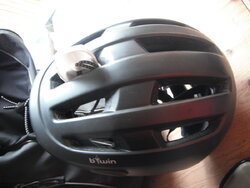
To use it, poke the plastic bit through one of the vent holes in the helmet (not whilst you are wearing it!!!!)

DSCF4471.JPG

Pull the elastic tight with the spring toggle that is already on it, and voila!

DSCF4473.JPG
 

wisdom

Guru
Location
Blackpool
[QUOTEi"Salad Dodger, post: 3680518, member: 8278"]Today I made a helmet carrier to go on my rucksack. (The idea was borrowed from a rucksack I saw online). My rucksack has a elastic arrangement on the outside, presumably to be able to strap a jacket or something on the outside, for immediate access. But I could not find any way to use it to SECURELY hold a crash helmet.
View attachment 88081

So I cut the bottom off a plastic bottle and used a cable tie to secure it to the elastic on the rucksack.

View attachment 88083 View attachment 88084

View attachment 88085

To use it, poke the plastic bit through one of the vent holes in the helmet (not whilst you are wearing it!!!!)

View attachment 88086

Pull the elastic tight with the spring toggle that is already on it, and voila!

View attachment 88087 [/QUOTE]
Great Idea and a nice neat job.
Perhaps we could start a thread"show us your inventions" Bet it would throw up some great ideas.
 

raleighnut

Legendary Member
[QUOTEi"Salad Dodger, post: 3680518, member: 8278"]Today I made a helmet carrier to go on my rucksack. (The idea was borrowed from a rucksack I saw online). My rucksack has a elastic arrangement on the outside, presumably to be able to strap a jacket or something on the outside, for immediate access. But I could not find any way to use it to SECURELY hold a crash helmet.
View attachment 88081

So I cut the bottom off a plastic bottle and used a cable tie to secure it to the elastic on the rucksack.

View attachment 88083 View attachment 88084

View attachment 88085

To use it, poke the plastic bit through one of the vent holes in the helmet (not whilst you are wearing it!!!!)

View attachment 88086

Pull the elastic tight with the spring toggle that is already on it, and voila!

View attachment 88087
Great Idea and a nice neat job.
Perhaps we could start a thread"show us your inventions" Bet it would throw up some great ideas.[/QUOTE]
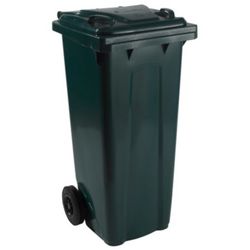
I've modified a receptacle for helmets
5012859013037_01c&wid=450&hei=450.jpg
 

Attachments

  • 5012859013037_01c&wid=450&hei=450.jpg
    5012859013037_01c&wid=450&hei=450.jpg
    10.3 KB · Views: 28

fossyant

Ride It Like You Stole It!
Location
South Manchester
New drivechain on the Fixed. Front chainring, sprocket and chain. £53

Front 46T ring - Miche Advanced (lovely rings), Fixed 16T (Token) drilled sprocket and my usual KMC 510HX 1/8th chain (won't use owt else).

Silky smooth and quiet.

The previous Miche Front ring has done about 5 years commute which isn't bad.
 

Gravity Aided

Legendary Member
Location
Land of Lincoln
New rim tape for the Schwinn Impact, after another blow-out. Previous job was not very good, so I've used a heavier cloth tape this time. I also re-taped the handlebar extensions, as the previous bar tape was getting mucky.
 

Gravity Aided

Legendary Member
Location
Land of Lincoln
Fuji%20near%20Six%20Mile%20creek_edited-1_zpsvfycjvxw.jpg
Finished work(for now) on the Fuji Touring Series IV, then took her for a test spin, flatted, patched tube and returned home just as rain began. I added SKS Bluemels Fenders today, as well as racks and a light from Aldi. They are really fettling my local Aldi, knocking brick out, removing interior, but still selling and open for business.
 

Attachments

  • Fuji%20near%20Six%20Mile%20creek_edited-1_zpsvfycjvxw.jpg
    Fuji%20near%20Six%20Mile%20creek_edited-1_zpsvfycjvxw.jpg
    11.4 KB · Views: 19

bpsmith

Veteran
Stripped front calliper on number 1 bike. Replaced inner and outer also. Swapped pads in from number 2 bike to see how much better they are than stock. Test ride imminent.
 
Top Bottom