BRounsley
Veteran
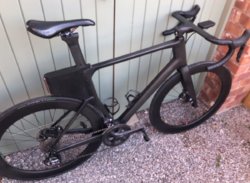
I built a bike!..and when I say “built” I mean assembled. It’s the first time I’d ever done one…so if anyone notices something unsafe, let me know!!!
The reason for the post is to talk about the frame as when I ordered it, real-life information was thin on the ground. So hopefully someone will find this useful.
The vision:
I wanted an unbranded carbon frame, in black. It had to have disc brakes. I also wanted electronic gears. I was aiming for an uncluttered stealth look. I’m sure watching the TV show Street Hawk has a part to play. After looking at a lot of Chinese frames I kept coming back to Miracle, so I bought it.
The frame:
So it’s a Miracle RD525. I specified it with a BSA bottom bracket standard. I wanted it matt black and went UD carbon. You can see some of the carbon construction. This is neat-ish but not perfect. Maybe if I did it again I’d get it sprayed matt black.
Things I’ve learnt about my frame:
Headset/Fork – I believe the fork has an integrated crown race. If it doesn’t I have no idea how to make one fit. The shipped headset didn’t have one, so I bought a headset with a crown race, and that doesn’t fit. The headset is an internal Taper 1-1/8” to 1-1/2”
Thru axel – My frame is the “E-Thru” standard - 12mm X 100mm front and 12mm x 142mm back. I now know they’re 3 main standards X12/ E-thru/Maxle. Being E-Thru and 12 mm the thread pitch is M12 x1.5. The Thru axels that I bought with the frame are trud, so I’ve since bought some better ones.
Frame ports/bungs - The frame shipped with extra rubber bungs for a Di2 setup. This included a blanking bung (1 Di2 wire vs 2 cables) and other bungs as Di2 wires are thinner than cables.
Seatpost – I had to cut the seatpost down…it was super long. The internal clamp is very effective. If anything too effective, as I really struggle to remove the post after it’s been clamped.
Di2 Battery – I fitted the Di2 Battery into the aero seat post by sticking it inside a bit of old inner tube and forcing it into the seat post. Worked a treat
Bottom Bracket –I went BSA. I fitted a Shimano BB and it was super straightforward and easy. I’d never fitted a bottom bracket before.
Frame cost:-
£391.77 frame+fork+seat post+clamp
£36 Delivery
£44 Customs charge (didn’t see that coming)
Riding the bike. It feels like my other carbon framed bike (Moda Stretto). Maybe a bit more comfortable, but this bike also has bigger volume tyres. It doesn’t seem to overly flex, or it flexes in the right way. I like the ride.
The rest of the built:
It’s a 6870 Ultegra Di2 groupset. As it was the cheapest electronic groupset I could find.
HUNT 4Season Gravel Disc Road/CX Wheels. I wanted a high spoke count, 28, as I’m a serial spoke snapper. Going alu over carbon rims was a budget consideration. I’ve also went tubeless. I like the wheels.
The built bike is just less than 8.5kg (including pedals, empty saddle bag, and bottle cages) and is a size 58.
I bought some extra Di2 stuff (the bar end junction box A, the Bluetooth dongle, and the Y wire) and that added nearly £200 to the built. £60 for a wire, shame on you Shimano!!! The Di2/groupset was over half of the cost, therefore going 105 and cable would be a massive cost reduction.
Build issues and mishaps.
I had no built issue with the frame other than the lack of information (integrated crown race and Thru axel standard).
I did mess-up (literally) the rear brake hose and contaminated the rear disc/pads. The dishwasher and sanding came to the rescue.
A few times through the built the Di2 went dead. One time as I left the Bluetooth on (talking to my phone), overnight and it drained the battery. But mainly because I dislodged a connector while tinkering.
The internal routing in the handlebars was fiddly. But with the bar end junction box, wires and brake hoses, there was a lot to fit in.
My total spend was £2,655.22 (reusing my saddle and pedals)…I let you decide if you think that’s good or bad. Cost Breakdown::
79.3 Handlebar
391.77 frame+fork+seat post+clamp
36 Frame Delivery
44 Customs
369 Wheels
99 Tyres
9.99 Wheels Axle Adapter
32 Thru Axle
4.99 spacers
19.13 bottle cage
119.68 disc rotors
1249.99 Groupset
84.39 bar end junction
59.99 di2 Y cable
55.99 di2 com/Bluetooth box
I also spent another £80 buying tools (I already had some, cassette tool, torque wrench etc).