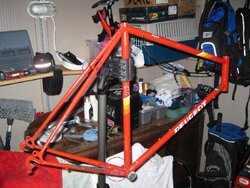
'86 Peugeot Elite Road Bike Project

Page may contain affiliate links. Please see terms for details.

lmk1

Active Member
to Teuchter
no issues with sticking the decals over the powder coat. I did buy some lacquer from Halfords and gave everything a spray when I was finished. if you are getting the frames powder coated insist on getting them shot blasted then collect them to tape up all the threads before returning them to be powder coated. I had problems and needed to retap various threads.
 

biggs682

Itching to get back on my bike's
Location
Northamptonshire
looks nice imho i would have gone for a more retro crankset
 

zophiel

Veteran
Location
Glasonbury
I have one of these sat on my shed wall at the moment, unsure what to do with it. Just the frame forks and bars. there is some corrosion on the bottom of the headset tube.

p4pb424317.jpg
 
What biggs said :thumbsup:

I've done a couple of 'low end Carbolite' Pugs and they've always turned out well and ridden really nicely.

+1 for a brake pad upgrade, and this will benefit you even if you replace the wheels, so it's a win/win.

The only negative with some French bikes, and Pugs in particular is their use of 24mm seatposts, but if it's not stuck and/or you've got enough post then it's not a problem, if not they are a right bitch to find.

A word of warning though, resto's can easily run aawy with your budget if your not careful, trust me on that :whistle:

These are the two I've previously done. First one I did a fixed gear conversion and cheated with PX10 decals for a period look, but it was a 198* Carbolite in reality :whistle:

BEFORE:
img0750m.jpg


AFTER:
sideviewangled.jpg


The second one I did a modern 10 speed conversion from what was basically another Carbolite frame, (can't find the before pic), into a full on winter bike/commuter: Note the use of older decals again ;)

img0926lv.jpg


Both projects were a joy to do, but both blew my initial budget out of the water, but you do these things for fun don't you. You'd never make money doing this for a living!

Important note: COLD SETTING alu frames to accept modern hubs is not recommended. I braced the whole thing at every stress point and went really slowly using the threaded bar method. Steel is perfect for cold setting but alu is a no no, although it can be done you need to be aware of the risks.


have you resprayed this ? well obviously you did cos its a different colour but how did you go about it? sand the frame down? also is the best way just to remove the decals and buy new ones ?
 
have you resprayed this ? well obviously you did cos its a different colour but how did you go about it? sand the frame down? also is the best way just to remove the decals and buy new ones ?

Yup, both fully re-sprayed. I use Nitro Mors paint stripped to get rid of the bulk of the paint, then sand any areas that might have been missed, (not many if any TBH), then key the frame with a light sanding, then I gave them to a mate who owns a vehicle bodyshop, so exactly what he did I'm oblivious too TBH, they just come paint looking shiny and spanking.

You can do them with a rattle can, (aerosol), but you do need to take your time to get a good finish. Powder coating is another option, and this is more a lot harder wearing than a paint finish, just depends on what you plan to do with it, how good a finish you want, the timescale, facilities available to you and ultimately cost.

Not all decals are available, but loads of new decals are readily available from place like H.LLOYD CYCLES :thumbsup:
 

ehutchison

New Member
Hi guys, really interesting reading here.

Smokeysmoo, I'm really interested in how you cold-set your carbolite frame. I've got a Premiere pug in carbolite 103 that I bought earlier in the year and I'm looking for a modern upgrade, much like what you've done but the dropout width seems to be my problem.
You mention you went for the threaded bar method, as opposed to Sheldon's 2x4 (something I'd be much more inclined to do).
I'm obviously keen to not damage the frame so I'm interested to know where you braced the frame and over what time you expanded the dropout?

I have a modern pair of alloy wheels with a 135mm hub width which do fit in-between the dropouts when stretched but the quick-release doesn't tighten sufficiently to be road-worthy, I assume because the dropouts haven't been *set*. Is this a problem anyone else has encountered?

As for the seat post, I'm lucky to have a peugeot mountain bike post to suit my height (6'3" on 60" frame) and there's a company in the states who make converters for the odd tub diameters for modern stems because I couldn't for the life of me find a suitably sized quill stem.

I just need to get ride of the suicide brake levers...

What biggs said :thumbsup:

I've done a couple of 'low end Carbolite' Pugs and they've always turned out well and ridden really nicely.

+1 for a brake pad upgrade, and this will benefit you even if you replace the wheels, so it's a win/win.

The only negative with some French bikes, and Pugs in particular is their use of 24mm seatposts, but if it's not stuck and/or you've got enough post then it's not a problem, if not they are a right bitch to find.

A word of warning though, resto's can easily run aawy with your budget if your not careful, trust me on that :whistle:

These are the two I've previously done. First one I did a fixed gear conversion and cheated with PX10 decals for a period look, but it was a 198* Carbolite in reality :whistle:

BEFORE:
img0750m.jpg


AFTER:
sideviewangled.jpg


The second one I did a modern 10 speed conversion from what was basically another Carbolite frame, (can't find the before pic), into a full on winter bike/commuter: Note the use of older decals again ;)

img0926lv.jpg


Both projects were a joy to do, but both blew my initial budget out of the water, but you do these things for fun don't you. You'd never make money doing this for a living!

Important note: COLD SETTING alu frames to accept modern hubs is not recommended. I braced the whole thing at every stress point and went really slowly using the threaded bar method. Steel is perfect for cold setting but alu is a no no, although it can be done you need to be aware of the risks.
 
Smokeysmoo, I'm really interested in how you cold-set your carbolite frame. I'm obviously keen to not damage the frame so I'm interested to know where you braced the frame and over what time you expanded the dropout?
The threaded bar method allows for more finesse than simply levering things apart with a piece of 2 x 4, and I wouldn't recommend the latter on an alu frame anyway. BTW, cold setting in anyway shape or form is not recommended for alu frames at all TBH.

That said, it clearly can be done with a little patience.

I just braced the frame at the stress points between the chain stays and the seat stays

Old Frame (800x600).jpg

I just got a piece of threaded rod, size doesn't really matter as long as it fits in the drop outs, but not too thin so it bends under pressure. Spin two nuts onto the rod, then slide on two big flat washers.

Fit the rod in the drop outs with all the 'hardware' on the inside and then tighten the nuts upto the washers.

Just tighten one side a couple of turns and then the other, and just keep going until you've spaced it about 5mm beyond what you need it to be, (this allows for some springback).

I left it for a couple of days while I was doing other jobs anyway, but overnight should do it. If not just stick the bar back in for a bit longer.

Another way I've done it, (but it's a bit Heath Robinson TBH, and probably even less recommended on an alu frame than Sheldon's method as well), is to cut of piece of timber 5mm wider than you want, force the dropouts apart and wedge the timber in, leave it a day or so and Bob's your Uncle.

Hope that helps :thumbsup:
 
Top Bottom