BearKnots
Über Member
- Location
- West London
How Do All ;-)
For Sale!
http://ropeandcanvas.blogspot.co.uk/2014/08/for-sale-velokit-trike-body.html

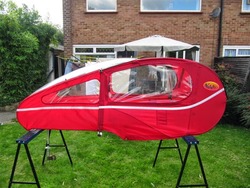
Here I have for sale a VeloKit trike body.
This is Kit #54 and it was made in 2010 by Krash of VeloKit.com.
I bought this item with my ICE TriceQ as part of a package deal, I have never used it, but it was used by the previous owner, all of the parts are here and the kit is complete bar 2 jubilee clips or heavy zip ties to secure the rear mounting bar to the trike, thought I personally would lash the VeloKit parts to the trike with twine if I was going to use it!
The kit fits to the Ice Trice Q and I guess should fit to other Trice's Sprints and Adventure models? and quite possible many other trikes of a similar frame layout.
The kit secures to the arms or the trike Cruciform and to the rear of the seat or possibly rack? (I never fitted it so can only guess without trial fitting it to a trike)
The side windows zip back and have securing tethers to keep them rolled open.
The front polycarbonate bubble screen pivots forward to give easy access and the front quater panels and roof can be removed to use in hot weather.
the rear opens up like a boot to get to your rack and or panniers.
The kit is in great condition as you can see from the pictures, but could do with a quick wipe over to remove storage dust,
The polycarbonate screen is in great condition and has very few fine scratches or marks and has no cracks or splits! again a good clean will see it sparkling.
The waterproof material is in great condition and has no tears and all the stitching is sound.
There are two pockets inside under the windows for your snacks, batteries or whatever and there are light mounts on the top sides.
Plenty of reflective materials for high viz at night and a flag pole pocket on each side of the cab.
The kit can be put together in minutes and the mounting parts can be left on the trike when removing the whole body so you can fit it back on quickly.
There are two guards that attach to your handlebars to keep the wheels from rubbing the material and if you have mudguards these are not needed.
I have no instructions but am happy to give whatever advice I can on assembly, I put it together in less than twenty minutes the first time with no clue or pictures of what it should look like.
My pictures should be more than enough instruction.
The self adhesive Velcro in a couple of places could do with replacing as the ends have lifted a little but still work fine.
The whole kit breaks down quickly to pack in the boot of a car and the front screen rolls up small when the frame part is removed from it for storage.
Please see all the pictures for a full 360 visual examination.
I am more than happy to have anyone come visit me and examine the Velokit without obligation. I am in the Heathrow Villages area Hillingdon, Middlesex.
If you are interested in this item please contact me via:
knotty dot bear at gmail dot com
If you consider how much a Streamer fairing or Windwrap fairing costs to buy the asking price for this complete kit is a bargain IMO.
The Price I am asking for this is:
£250.00 ONO + £6.50 P+P or free to collect
Postage will be by next day DPD courier.
Payment either by Bank transfer to Nationwide account, cash in hand or Paypal (please add 3.4% to total to cover paypal fees unless sending monies as to a friend)
I will try to ship the same day payment is received if before 12 noon and the following day if after this. Monday to Friday only! also depending on time taken to pack the items.
Thank you for looking!
Take care,
Barry ;-)
The Pictures.


Flag Pole Pockets on each side


Frame mounts for cruciform arms secured with the large jubilee clips

Wheel guards and large fixing jubilee clips

quick release toggles for the flip up front section


Boom fixing and front pivot.


For Sale!
http://ropeandcanvas.blogspot.co.uk/2014/08/for-sale-velokit-trike-body.html
Here I have for sale a VeloKit trike body.
This is Kit #54 and it was made in 2010 by Krash of VeloKit.com.
I bought this item with my ICE TriceQ as part of a package deal, I have never used it, but it was used by the previous owner, all of the parts are here and the kit is complete bar 2 jubilee clips or heavy zip ties to secure the rear mounting bar to the trike, thought I personally would lash the VeloKit parts to the trike with twine if I was going to use it!
The kit fits to the Ice Trice Q and I guess should fit to other Trice's Sprints and Adventure models? and quite possible many other trikes of a similar frame layout.
The kit secures to the arms or the trike Cruciform and to the rear of the seat or possibly rack? (I never fitted it so can only guess without trial fitting it to a trike)
The side windows zip back and have securing tethers to keep them rolled open.
The front polycarbonate bubble screen pivots forward to give easy access and the front quater panels and roof can be removed to use in hot weather.
the rear opens up like a boot to get to your rack and or panniers.
The kit is in great condition as you can see from the pictures, but could do with a quick wipe over to remove storage dust,
The polycarbonate screen is in great condition and has very few fine scratches or marks and has no cracks or splits! again a good clean will see it sparkling.
The waterproof material is in great condition and has no tears and all the stitching is sound.
There are two pockets inside under the windows for your snacks, batteries or whatever and there are light mounts on the top sides.
Plenty of reflective materials for high viz at night and a flag pole pocket on each side of the cab.
The kit can be put together in minutes and the mounting parts can be left on the trike when removing the whole body so you can fit it back on quickly.
There are two guards that attach to your handlebars to keep the wheels from rubbing the material and if you have mudguards these are not needed.
I have no instructions but am happy to give whatever advice I can on assembly, I put it together in less than twenty minutes the first time with no clue or pictures of what it should look like.
My pictures should be more than enough instruction.
The self adhesive Velcro in a couple of places could do with replacing as the ends have lifted a little but still work fine.
The whole kit breaks down quickly to pack in the boot of a car and the front screen rolls up small when the frame part is removed from it for storage.
Please see all the pictures for a full 360 visual examination.
I am more than happy to have anyone come visit me and examine the Velokit without obligation. I am in the Heathrow Villages area Hillingdon, Middlesex.
If you are interested in this item please contact me via:
knotty dot bear at gmail dot com
If you consider how much a Streamer fairing or Windwrap fairing costs to buy the asking price for this complete kit is a bargain IMO.
The Price I am asking for this is:
£250.00 ONO + £6.50 P+P or free to collect
Postage will be by next day DPD courier.
Payment either by Bank transfer to Nationwide account, cash in hand or Paypal (please add 3.4% to total to cover paypal fees unless sending monies as to a friend)
I will try to ship the same day payment is received if before 12 noon and the following day if after this. Monday to Friday only! also depending on time taken to pack the items.
Thank you for looking!
Take care,
Barry ;-)
The Pictures.
Flag Pole Pockets on each side
Frame mounts for cruciform arms secured with the large jubilee clips
Wheel guards and large fixing jubilee clips
quick release toggles for the flip up front section
Boom fixing and front pivot.