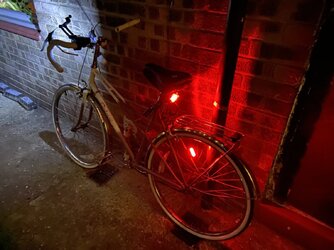
Raleigh Panache front brake

Page may contain affiliate links. Please see terms for details.

haleno1

Regular
Hi guys
Totally know nothing so here goes
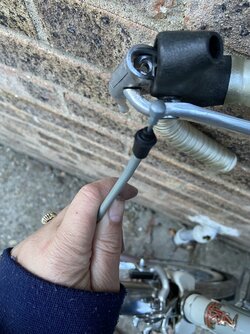
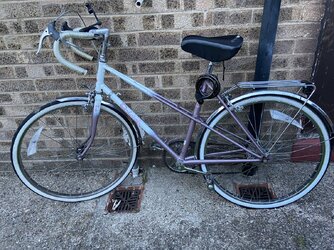
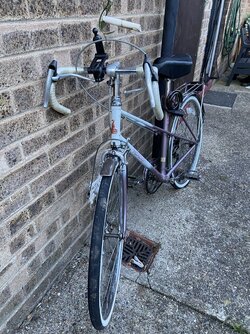
I changed the brake pads on my panache no problem fit really well. But before I did this noticed that the front brake wasn’t responding like it should needed a lot of pull to get a bit of brake. Then whilst I was looking at the brake seeing where to adjust I tried the front brake one more time and the wire had come out of the handlebars No idea how to get it back in and then to adjust back into right position. Is you tighten the brake near where it goes into the front handlebar it has all come loose so wasn’t doing anything that I could see. I’ve posted pics to show you were I mean. At a guess I’d say I have to re thread and undo the brake at the calliper but I have no idea. I do love this bike though Learning as I go. I did look this up on YouTube but it’s as clear as mud. The cable itself seems alright just needs putting back on.

IMG_7732.jpeg
 

Attachments

  • IMG_7730.jpeg
    IMG_7730.jpeg
    91.2 KB · Views: 23
  • IMG_7732.jpeg
    IMG_7732.jpeg
    133 KB · Views: 25
  • IMG_7733.jpeg
    IMG_7733.jpeg
    416.9 KB · Views: 25
  • IMG_7734.jpeg
    IMG_7734.jpeg
    244.9 KB · Views: 24

Cycleops

Legendary Member
Location
Accra, Ghana
You will have to remove the existing cable and put a new one in, this is because the end will be frayed and it won't be possible for it to slide through the outer housing without catching.
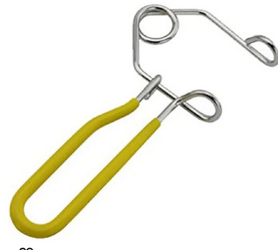
When you've done that pass the end through the securing bolt on the caliper and pull it down tightly while squeezing the the two sides of the caliper together & tightening it. Very difficult if not impossible to do which is why you can use a 'third hand' to hold the caliper against the rim.

Screenshot_20240616-210702.png
If you don't have a cable cutter to trim the excess just coil it.
You have chrome rims so don't expect the braking to be very sharp especially in the rain.
 

Brandane

Legendary Member
Location
Costa Clyde
You will have to remove the existing cable and put a new one in, this is because the end will be frayed and it won't be possible for it to slide through the outer housing without catching.
When you've done that pass the end through the securing bolt on the caliper and pull it down tightly while squeezing the the two sides of the caliper together & tightening it. Very difficult if not impossible to do which is why you can use a 'third hand' to hold the caliper against the rim.

View attachment 734330
If you don't have a cable cutter to trim the excess just coil it.
You have chrome rims so don't expect the braking to be very sharp especially in the rain.

Might not be necessary to replace the cable though; IF it is possible to get enough free cable at the handlebar end to hook the nipple back onto the lever without pulling the cable past the securing nut at the caliper end....
Might have to loosen the cable pinch bolt at the caliper to give you some more free cable at the lever end (but make sure you don't pull it through the hole in the retaining bolt, or you will have to replace the cable as it probably will be frayed and won't go back through the hole).
Then hook the nipple back onto the bit in the lever (check the other brake to see how it all goes together); pull the cable tight through the retainer nut/bolt at the caliper (leave some free play so the brake doesn't rub on the rim) then re-tighten the nut.
Might sound complicated (I am not a good teacher!) but it's not....
If you don't feel confident, it's a 5 minute job for a bike mechanic, or do you know anyone with some bike knowledge?
 

raleighnut

Legendary Member
Might not be necessary to replace the cable though; IF it is possible to get enough free cable at the handlebar end to hook the nipple back onto the lever without pulling the cable past the securing nut at the caliper end....
Might have to loosen the cable pinch bolt at the caliper to give you some more free cable at the lever end (but make sure you don't pull it through the hole in the retaining bolt, or you will have to replace the cable as it probably will be frayed and won't go back through the hole).
Then hook the nipple back onto the bit in the lever (check the other brake to see how it all goes together); pull the cable tight through the retainer nut/bolt at the caliper (leave some free play so the brake doesn't rub on the rim) then re-tighten the nut.
Might sound complicated (I am not a good teacher!) but it's not....
If you don't feel confident, it's a 5 minute job for a bike mechanic, or do you know anyone with some bike knowledge?
Take the front wheel out and squeeze the arms of the caliper together, that should give enough slack to hook the nipple into it's recess in the lever you may need 2 people to do this or creative use of a zip tie to hold the caliper arms together would be my method
 

Jameshow

Veteran
Just to say the lose end of the cable goes up from the ground, behind the brake lever through that round hole visible behind the brake lever, then through the hood (black plastic part at the top of the brake lever, into the brake cable outer casing and into the brake adjuster on the breaker caliper itself then though the holed bolt with the nut on. Make sure the fixed end is firmly fixed in the brake lever and the cable outer casing is in the brake lever and brake ok.
 
Last edited:

raleighnut

Legendary Member
Just to say the lose end of the cable goes up from the ground, behind the brake lever through that round hole visible behind the brake lever, then through the hood (black plastic part at the top of the brake lever, into the brake cable outer casing and into the brake adjuster on the breaker caliper itself then though the holed bolt with the nut on. Make sure the fixed end is firmly fixed in the brake lever and the cable outer casing is in the brake lever and brake ok.

There is no need to remove the inner, that's an old Raleigh set up (but similar to other brake levers of that era) it is totally unlike 'modern 'brifter' set ups in that the cable inserts from the top of the lever and the black ferule prevents the outer from fitting through the hole the only snag is getting enough slack to hook the nipple into the lever recess. The only problem is you're working blind getting it in although because the lever has 'suicide' secondary levers fitted the part that retains the nipple doesn't turn as it would with ones without that additional part fitted.
I'd have the cable fitted in minutes albeit with a bit of a faff but taking the wheel out will allow the pads to come far closer together giving enough 'slack' to hook it in then releasing the caliper will give enough tension to retain it.
 

Jameshow

Veteran
There is no need to remove the inner, that's an old Raleigh set up (but similar to other brake levers of that era) it is totally unlike 'modern 'brifter' set ups in that the cable inserts from the top of the lever and the black ferule prevents the outer from fitting through the hole the only snag is getting enough slack to hook the nipple into the lever recess. The only problem is you're working blind getting it in although because the lever has 'suicide' secondary levers fitted the part that retains the nipple doesn't turn as it would with ones without that additional part fitted.
I'd have the cable fitted in minutes albeit with a bit of a faff but taking the wheel out will allow the pads to come far closer together giving enough 'slack' to hook it in then releasing the caliper will give enough tension to retain it.

Please excuse my youthful ignorance!
 

Cycleops

Legendary Member
Location
Accra, Ghana
Although I'm sure it's possible to reuse the old cable in situ but it may have been in there for a long time and a new one with some grease would likely increase braking efficiency. Those side pulls and chrome rims need all the help they can get. :smile:
Might be an idea to do the rear one too at the same time.
 
Last edited:

Dogtrousers

Kilometre nibbler
There's a metal cylinder inside the lever (I don't know what its name is) and you need to seat the nipple (the metal blob on the end of the cable) inside that cylinder. In your photo the cylinder is "upside down". It needs to have that side facing down with the nipple seated in it. There's a slot in the front (left hand side in the picture) that will take the cable. The whole cylinder needs to rotate 180 degrees clockwise (as we look at it.)
1718614916146.png

The knack to getting the cable seated back into the lever is to push obliquely on the cylinder with the cable nipple and rotate it. The cylinder will rotate and the slot will come up to take the cable, the open bit (currently facing up) will face down ready to receive the nipple. Then pull back on the cable and it will seat inside the cylinder.

Does that make any kind of sense?

You'll need to do this whether you replace the cable or not. You need a bit of slack to be able to do this.

(Edit, maybe I've got that the wrong way round and it's already the right way up. I dunno, it's been ages since I did one of these. Basically poke around inside the lever with the nipple until you can get it to seat)
 
Last edited:

raleighnut

Legendary Member
There's a metal cylinder inside the lever (I don't know what its name is) and you need to seat the nipple (the metal blob on the end of the cable) inside that cylinder. In your photo the cylinder is "upside down". It needs to have that side facing down with the nipple seated in it. There's a slot in the front (left hand side in the picture) that will take the cable. The whole cylinder needs to rotate 180 degrees clockwise (as we look at it.)
View attachment 734369
The knack to getting the cable seated back into the lever is to push obliquely on the cylinder with the cable nipple and rotate it. The cylinder will rotate and the slot will come up to take the cable, the open bit (currently facing up) will face down ready to receive the nipple. Then pull back on the cable and it will seat inside the cylinder.

Does that make any kind of sense?

You'll need to do this whether you replace the cable or not. You need a bit of slack to be able to do this.

(Edit, maybe I've got that the wrong way round and it's already the right way up. I dunno, it's been ages since I did one of these. Basically poke around inside the lever with the nipple until you can get it to seat)

Maybe whoever fitted those secondary (suicide) levers fitted them 180 degrees out of their correct alignment, once they're screwed to the barrel it won't rotate. Raleigh never fitted them as 'standard' but shops (or owners) put them on as an accessory

Ooh I had a look at the 'Dia Compe' suicide levers I fitted to my Raleigh Equipe and I'm wrong.....................they actually fit to the pivot not the barrel so it can be rotated to the right way up (fat part at the bottom to accept the nipple on the cable) but the rest of my advice is how you fit the cable is correct.
 

Dogtrousers

Kilometre nibbler
I have the muscle memory of how to seat a pear-nipple cable in an olde-fangled brake lever. I just don't have the words for it!

A bit like how you know some routes through a town and would never make a mis-turn, but you couldn't describe them to someone.
 
OP
OP
H

haleno1

Regular
Take the front wheel out and squeeze the arms of the caliper together, that should give enough slack to hook the nipple into it's recess in the lever you may need 2 people to do this or creative use of a zip tie to hold the caliper arms together would be my method

Maybe whoever fitted those secondary (suicide) levers fitted them 180 degrees out of their correct alignment, once they're screwed to the barrel it won't rotate. Raleigh never fitted them as 'standard' but shops (or owners) put them on as an accessory

Ooh I had a look at the 'Dia Compe' suicide levers I fitted to my Raleigh Equipe and I'm wrong.....................they actually fit to the pivot not the barrel so it can be rotated to the right way up (fat part at the bottom to accept the nipple on the cable) but the rest of my advice is how you fit the cable is correct.

Hi guys
Totally know nothing so here goes
I changed the brake pads on my panache no problem fit really well. But before I did this noticed that the front brake wasn’t responding like it should needed a lot of pull to get a bit of brake. Then whilst I was looking at the brake seeing where to adjust I tried the front brake one more time and the wire had come out of the handlebars No idea how to get it back in and then to adjust back into right position. Is you tighten the brake near where it goes into the front handlebar it has all come loose so wasn’t doing anything that I could see. I’ve posted pics to show you were I mean. At a guess I’d say I have to re thread and undo the brake at the calliper but I have no idea. I do love this bike though Learning as I go. I did look this up on YouTube but it’s as clear as mud. The cable itself seems alright just needs putting back on.

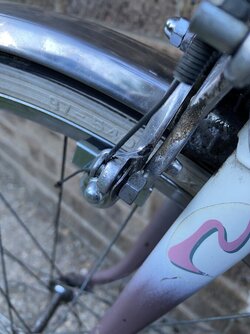
View attachment 734312

UPDATE guys I got the cable in. Managed to loosen it enough to get the end in handlebar part using the back brake handlebar as a reference but now my front caliphers aren’t moving in and out when I brake.
The back is perfect brake moves in moves back out as it should the front however is not moving or very very minimally
 

Cycleops

Legendary Member
Location
Accra, Ghana
How many years has that cable been in there,?
Like I said use a new cable with a bit grease. You'll feel the difference for minimal spend.
You might want to consider changing those rims/wheels to alloy hoops if you want 'proper' brakes.
 
OP
OP
H

haleno1

Regular
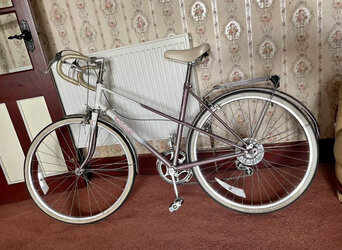
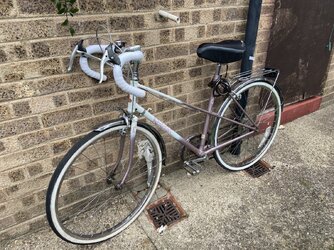
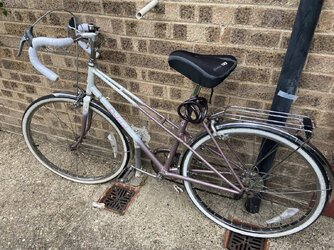
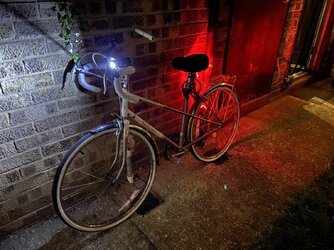
Hi guys UPDATE everything is done. New brake cable was needed in the end. Got that all fitted on ok new bike tape the old one looked like manky sellotape. Lights are on cleaned up a bit. The rest I need to do is nitt picky. Main thing is I have a working front brake again. I think my next move is new whitewall tyres and a nice white bike seat thanks for everyone that has sent me help I know nothing but managed to get this far. First picture is how I picked it up and the rest is what I’ve done
 

Attachments

  • IMG_8009.jpeg
    IMG_8009.jpeg
    121.5 KB · Views: 14
  • IMG_7827.jpeg
    IMG_7827.jpeg
    418.8 KB · Views: 13
  • IMG_7826.jpeg
    IMG_7826.jpeg
    417.3 KB · Views: 14
  • IMG_8008.jpeg
    IMG_8008.jpeg
    250.5 KB · Views: 13
  • IMG_8007.jpeg
    IMG_8007.jpeg
    164.2 KB · Views: 12
Top Bottom